Introduction
A single worn or unbalanced flail blade puts stress on everything connected to it — the rotor, bearings, and gearbox. Left unchecked, that stress compounds into expensive repairs and real safety hazards from flying debris. Most of those failures trace directly back to skipped maintenance.
Seasonal maintenance is what separates operators who get full blade life from those dealing with repeated breakdowns and uneven cuts. This guide covers the core inspection tasks, the warning signs that demand immediate action, and a printable season-by-season checklist to keep your machine running safely year after year.
Key Takeaways
- Inspect blades after every use; replace based on visible wear, not just hours logged
- Follow four seasonal stages: spring start-up, in-season upkeep, fall servicing, and winter storage
- Watch for vibration, uneven cuts, chipped or bent blades, and increased PTO strain
- Replace blades in balanced sets to protect the rotor and drivetrain
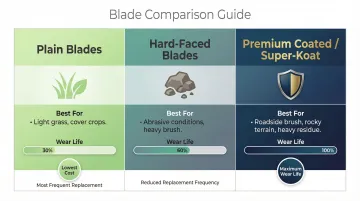
- Blade material grade — plain, hard-faced, or Super-Koat coated — determines how often maintenance is needed
Why Flail Mower Blade Maintenance Matters
Flail mower blades operate at speeds exceeding 2,000 RPM, transferring enormous stress to the rotor, bearings, and gearbox. When blades become worn or unbalanced, this stress multiplies rapidly. Alamo Industrial describes vibration from imbalance as a "MONSTER" that can cause complete machine break-up in a very short time. Bush Hog warns that severe vibration can rapidly damage rotor shaft bearings and cause structural cracks in the cutter housing.
Routine blade maintenance—sharpening, visual inspection, and timely replacement—costs far less than the repairs that neglected blades cause. Operators who ignore blade condition routinely face four-figure bills for bearing assemblies, drive components, and structural damage. Catching a worn blade early is almost always cheaper than rebuilding what it damages.
The cost consequences are serious—but the safety stakes are higher. Damaged or loose flail blades can detach at speed and become projectiles, putting operators, bystanders, and equipment at risk. The consequences of skipping maintenance include:
- Ejected blade fragments — OSHA accident reports document fatalities from flying objects during mowing operations
- Fatal equipment failures — the UK Health and Safety Executive issued safety alerts banning non-standard flail attachments after workers were killed by ejected metal components
- Structural machine damage — cracked housings and failed bearings that sideline equipment mid-season
Maintenance isn't a best practice. It's a safety requirement.
Core Flail Mower Blade Maintenance Tasks
The four primary blade maintenance tasks below apply regardless of season. Get these right and you'll avoid the most common causes of premature blade failure, rotor damage, and unsafe operation.
Routine Cleaning and Inspection
After each mowing session, remove packed grass, stems, and debris from the blade, rotor, and housing. Residue holds moisture against metal surfaces, accelerating rust and metal fatigue that weakens blades over time.
During visual inspection, look for:
- Chips along the cutting edge larger than 1/4" (8mm)
- Bends or twists in the blade body that alter swing path
- Worn pivot holes showing oval-shaped deformation
- Asymmetric wear patterns indicating repeated object strikes
Manufacturers like Alamo Industrial and Bush Hog mandate daily inspections for abnormal wear, visible cracks, gouges, or chipped areas. Daily checks catch small problems — chips, cracks, loose hardware — before they escalate into rotor damage or a thrown blade.
Blade Sharpening
Sharpening restores cutting performance when edges dull but the blade profile remains intact. Use a file or angle grinder to restore a consistent edge angle, working evenly on all blades to maintain rotor balance.
Critical sharpening guidelines:
- Sharpen only the angled rear edge at approximately 50 degrees — never grind the front face
- Apply light pressure to avoid overheating the metal (indicated by blue or brown discoloration)
- Leave a 1/16" blunt edge rather than sharpening to a razor edge
- Sharpen all blades on the rotor evenly to maintain balance
Overheating during grinding destroys the factory temper, causing the blade to lose hardness and its ability to hold a cutting edge. Once a blade shows cracks, significant deformation, or metal loss beyond surface dulling, sharpening won't restore safe performance. Replace it.
Blade Replacement
Blades must be replaced as a complete set or in matched pairs to maintain rotor balance. Mixing new and used blades alters weight distribution, creating vibration that damages bearings and drive components.
Flail rotors are dynamically balanced at the factory to tight tolerances. Installing one new blade among worn blades generates the same destructive imbalance as running with a missing blade entirely.
When sourcing replacement blades, match blade grade to application:
- Plain blades suit light grass and cover crops
- Hard-faced blades reduce replacement frequency in abrasive or heavy-duty conditions
- Premium coated options (such as Clean Cutter's Super-Koat blades, compatible with brands like Alamo-Mott, Rhino, Loftness, and Maschio) extend wear life in demanding environments involving roadside brush, rocky terrain, or heavy crop residue
Pivot Pin and Hardware Checks
Blade pivot pins, bolts, and retaining hardware should be checked for wear, stretch, or deformation each season. Loose pivots allow excess blade movement, increasing impact stress on the rotor and accelerating wear throughout the drivetrain.
Torque specifications vary by model. For example:
- Bush Hog RMB series: 100 ft-lbs with thread lock
- Loftness hydraulic flail mowers: 75 ft-lbs with thread-locking compound
- Alamo A-Boom spindles: 400 ft-lbs
Always consult your specific operator's manual for correct torque values and re-tighten hardware after the first 8 hours of operation and every 50 hours thereafter in severe conditions.
Warning Signs Your Flail Mower Blades Need Immediate Attention
Some problems can wait for the next scheduled service. These cannot — act on any of the following signs immediately.
Performance or Output Changes
Watch for:
- Uncut strips in the field where the mower previously handled coverage in one pass
- Vegetation torn rather than cleanly cut, leaving frayed stems and uneven residue
- Slower ground speed required or the need to make additional passes over areas the mower previously handled efficiently
Trimax notes that uncut strips are clear indicators that cutting efficiency is compromised and sharpening is no longer sufficient. Dull knives tear vegetation rather than slicing cleanly, forcing the engine and PTO to work harder.
Unusual Vibration or Noise
Excessive vibration during operation is the primary indicator of rotor imbalance caused by a missing, bent, or unevenly worn blade. If excessive vibration occurs, disengage the PTO immediately and shut off the tractor — per the Bush Hog operator manual, do not resume operation until the cause is identified and corrected. Continued use risks bearing failure, gearbox damage, and drivetrain failures that cost far more than a set of replacement blades.
Visible Physical Damage
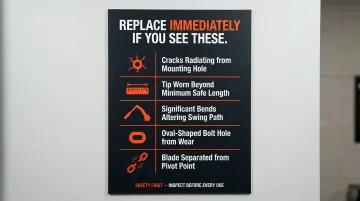
Replace blades immediately if you observe:
- Cracks running from the mounting hole into the blade body
- Blade tips worn to less than manufacturer's minimum length (typically when material has worn away by more than 1/4", approximately 6mm)
- Significant bends that alter the blade's swing path
- Oval-shaped wear inside the blade bolt hole
- Any blade that has separated from its pivot
Trimax specifies replacement when the tip radius exceeds 5mm, as worn blades reduce the cutting overlap between spindles, leaving uncut strips.
Increased Load on the Tractor
A noticeable drop in PTO efficiency, higher fuel consumption for the same terrain, or the tractor laboring under a cutting load it previously handled comfortably suggests blade edges are too dull to cut cleanly. Left unchecked, this kind of sustained overload shortens gearbox life and adds hours to your fuel bill — replacement blades are the cheaper fix.
Seasonal Flail Mower Blade Maintenance Checklist
Maintenance frequency and focus shift by season based on usage intensity, vegetation type, and storage conditions. This checklist is designed to be printed and used at each stage of the operating year.
Spring Start-Up Checklist
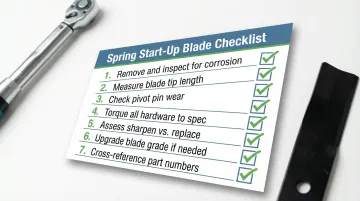
Pre-season blade tasks:
- Remove all blades and inspect each one for winter corrosion
- Measure blade tip length against manufacturer specs (replace if worn beyond 1/4" threshold)
- Check pivot pin wear and replace any showing deformation or oval holes
- Torque all blade hardware to spec (consult your manual for model-specific values)
- Assess whether blades need sharpening or full replacement before the first cut
- Upgrade blade grade if the previous season showed accelerated wear — hard-faced or Super-Koat coated blades handle abrasive soil and rocky conditions significantly longer than plain steel
- Cross-reference part numbers for compatibility with your specific mower model
Order replacement blades before the first scheduled mow — lead times on specific OEM cross-reference parts can run several days, and running a short-staffed rotor into the first heavy cut is a preventable problem.
In-Season Weekly and Monthly Checklist
Weekly tasks:
- Visual post-mow inspection for new chips or bends
- Check for missing blades after hitting debris
- Listen for vibration changes during operation
- Clear debris from housing and rotor
Monthly tasks:
- Re-torque pivot hardware to spec
- Check pivot pins for elongated holes
- Sharpen edges as needed, maintaining even edge angles across all blades
- Verify rotor balance by checking for unusual bearing temperatures or vibration patterns
As heavy-use months accumulate hours, wear patterns that started as minor chips can accelerate. The end-of-season checklist below is designed to capture what in-season inspections may have missed.
End-of-Season (Fall) Checklist
End-of-season blade tasks:
- Remove, clean, and fully inspect every blade
- Replace worn blades before storage so the mower is ready at spring start-up
- Apply a thin, even rust-inhibiting coating to blade surfaces and pivot pins
- Document blade condition and hours logged for the season to inform next year's replacement planning
- Note any performance issues or unusual wear patterns to address before next season
Winter Storage Checklist
Storage-specific blade care:
- Ensure all blades are dry before covering the mower
- Store with the rotor in a position that prevents blade-to-blade contact stress
- Confirm the mower deck is fully lowered to reduce belt and component stress during the off-season
- Park in a clean, dry area away from high humidity
- Relax drive belt tension to prevent permanent deformation
Never store blades under tension. When spring start-up rolls around, a properly stored mower needs inspection — not emergency part sourcing before the first cut of the year.
Conclusion
A structured seasonal maintenance routine is what separates operators who replace blades reactively from those who keep their equipment running reliably all year. Following this checklist consistently protects your investment, cuts unplanned downtime, and keeps cutting performance safe and predictable.
Print and post the seasonal checklist in your shop, note blade condition at each stage, and order replacement blades before you need them rather than after a breakdown forces the issue.
When selecting replacements, match blade grade to your operating conditions:
- Plain blades — light grass and low-debris environments
- Hard-faced blades — gravel shoulders, rocky soil, or abrasive ground cover
- Super-Koat blades — demanding conditions where extended wear life justifies the upgrade
Frequently Asked Questions
Do flail mower blades need sharpening?
Yes, blades benefit from sharpening when edges are dull but the blade profile is still intact. All blades on the rotor should be sharpened evenly to maintain balance, using light pressure to avoid overheating the metal and destroying the factory temper.
How long do flail mower blades last?
Blade lifespan depends on usage intensity, vegetation type, and terrain. Well-maintained blades average 100 to 200 hours, while heavy-duty applications may require replacement every 50 to 100 hours. Track operating hours and inspect regularly — fixed replacement intervals rarely account for variable conditions.
What blades are best with a flail mower?
Blade selection depends on the application. Plain blades suit light grass, hard-faced blades handle heavy brush and abrasive conditions, and premium coated options like Clean Cutter's Super-Koat blades offer extended wear life for operators working in demanding environments.
How do you know when to replace vs. sharpen flail mower blades?
Sharpen when edges are dull but the blade body is intact. Replace any blade showing cracks, significant bends, worn pivot holes, or tip loss beyond the manufacturer's minimum — typically 1/4" of material. An imbalanced rotor from a damaged blade causes far more costly damage than a replacement set.
Should you replace all flail mower blades at once?
Yes — replace blades in full sets or matched pairs to maintain rotor balance. A single new blade paired with worn ones creates imbalance that stresses bearings and drivetrain components. Those repairs consistently cost far more than a complete blade set.