Introduction
A flail mower rotor spins at over 2,000 RPM. The blades are heavy, sharp, and under tension — and the machine must be fully de-energized before you touch any of them. Blade replacement is straightforward when done correctly, but shortcuts create consequences that go well beyond a bad cut.
Get the replacement wrong, and you're looking at:
- Rotor imbalance — excessive vibration that destroys bearings and gearboxes
- Hardware failures mid-operation — a serious injury risk to anyone nearby
- Voided warranties — Loftness explicitly classifies bearing failures, drive-line failures, and metal fatigue from imbalance as operator abuse, not covered under warranty
This guide covers every step of the process — from initial shutdown and safety prep through torque specs and post-installation checks — so the job gets done right the first time.
Key Takeaways
- Shut down the machine with PTO disengaged and rotor locked before touching any blades
- Replace blades in matched sets or all at once—never just one blade—to maintain rotor balance
- Use the correct-grade bolts, shackle pins, and keeper pins specified for your mower, torqued to manufacturer spec
- Match blade type to conditions: Y/knife blades for grass, hammer blades for woody brush
- Perform visual inspection and test run before returning to full duty
Before You Replace Flail Mower Blades
Prerequisites and Safety Preparations
Before any blade work begins, these non-negotiables apply:
- PTO must be disengaged
- Tractor engine shut off and key removed
- Rotor must come to a complete stop — residual spin can persist for several minutes after shutdown
Required PPE: Heavy-duty cut-resistant gloves, safety glasses or face shield, and steel-toed boots. Even a stationary blade can cause serious cuts when handled without protection. OEMs warn that blade ejection at operating speed causes serious bodily injury or death.
Consider calling a professional if you're dealing with:
- Large commercial decks
- Unfamiliar machine configurations
- Damaged carriers or seized hardware
- A new-to-you model you haven't worked on before
With safety squared away, gather the right tools before touching the rotor.
Tools and Parts Required
For tools, you'll need:
- Breaker bar or impact wrench (sized to blade bolt specification)
- Calibrated torque wrench
- Soft-jaw vise or blade-holding tool to prevent rotor movement
- Penetrating oil and wire brush for cleaning hardware seats
- Clean rag
For parts, have on hand:
- Replacement blades matched to rotor position and mower model
- New grade-8 bolts and lock hardware (or shackle pins with keeper pins/circlips)
- Washers or spacers specified in the OEM manual
A rotor locking bar or wedge block makes the job safer. A complete hardware replacement kit is also worth having — OEMs prohibit reusing stretched bolts or nyloc nuts, so don't count on reusing what came off.
Choosing the Right Replacement Blade
Start with blade type, then narrow by hardness grade.
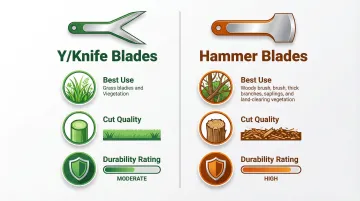
| Blade Type | Best For | Cut Quality | Durability |
|---|---|---|---|
| Y/Knife Blades | Grass, light vegetation, road verges | Clean, consistent finish | Moderate; less durable in heavy brush |
| Hammer Blades | Woody material, thick brush, land clearing | Coarse, pulverized finish | High; withstands impacts |
Once you've confirmed blade type, match the hardness to your conditions:
- Plain carbon steel: Standard conditions, lighter use
- Hard-faced blades: Abrasive conditions; field tests show hard-faced parts last twice as long as plain steel
- Super-Koat: Lasts three or more times longer than plain steel in rocky or abrasive terrain
Before ordering, confirm compatibility — blade dimensions, mounting hole size, and weight all affect rotor balance. Clean Cutter's cross-reference catalog covers Alamo-Mott, Maschio, Rhino, Loftness, Seppi, Sicma, and more — use it to confirm compatibility before ordering. Never mix blade grades or types on the same rotor — every blade in the set must be identical in weight and specification.
How to Replace Flail Mower Blades (Step-by-Step)
Blade replacement follows a fixed sequence: prep, removal, inspection, installation, and final torque. Each stage builds on the last, so work through them in order.
Removing the Old Blades
- With the machine fully shut down and rotor locked, apply penetrating oil to each blade bolt or shackle pin
- Allow oil to soak for 15–30 minutes (or overnight for severely corroded hardware)
- Use a wire brush to clean the hardware seat of debris and rust before attempting removal
- Apply steady pressure with a breaker bar — avoid impact shock, which can damage carriers
- Remove blades one side at a time, inspecting each mounting bracket (carrier) for cracks, wear, or deformation as it is exposed
A damaged carrier must be replaced before new blades are fitted.
Installing the New Blades
Most blades are directional and marked with a cutting edge or rotation arrow. Confirm orientation against the mower's rotation direction before sliding blades onto pins or bolts.
- Thread new hardware (bolts or shackle pins) by hand first to confirm threads are clean and undamaged
- Never reuse old lock hardware: split pins, nyloc nuts, and circlips lose retention over time and cause blade loss. Alamo Industrial identifies bolt breakage as most commonly caused by reusing old bolts
- Torque all blade hardware to the manufacturer's specification using a calibrated torque wrench
- Check the torque value in your mower's service manual — over-torquing distorts carriers, while under-torquing allows hardware to back out
Completing the Set
After all blades on one side are installed, rotate the rotor by hand to the next position (keeping it locked at each stop), then repeat the process on the opposite side.
- Confirm blade count and weight are balanced evenly across the rotor
- Hand-check every bolt and pin before closing the deck housing
- Re-secure all safety guards and shields before restoring power
Post-Replacement Checks and Validation
Once the mower is fully reassembled, a structured validation sequence confirms the installation is safe before returning to full-duty work.
Initial test run:
- With guards in place, start the tractor and engage PTO at low throttle for approximately 30 seconds
- Stand clear and observe for unusual vibration, noise, or rattling
- These indicate imbalance or loose hardware that must be resolved before full-speed operation

That initial run is only half the check. Shut down completely and perform a second torque inspection before considering the job done.
Second torque check:
- Shut down again and perform a second torque check after the initial run
- Thermal cycling and initial load can cause fasteners to seat slightly, requiring re-torquing
- This step is especially important with new fasteners
Indicators of successful replacement:
- Smooth rotor operation with no vibration beyond normal
- No loose hardware on post-run inspection
- Clean cutting pattern on a short test pass through vegetation before full-duty use
Common Blade Replacement Problems and Fixes
Blades Cannot Be Removed (Seized Hardware)
Problem: Bolts or shackle pins are corroded and won't break free — usually from prolonged moisture exposure at mounting points without lubrication.
Fix:
- Soak with penetrating oil for 15–30 minutes and reapply if needed
- Apply heat with a torch to expand the metal around the fastener (see technique details)
- Use a breaker bar with steady pressure rather than impact shock
- If the pin shears, a machinist will need to drill out the carrier
Excessive Vibration After Replacement
Problem: Machine vibrates more than normal after new blades are fitted — typically from mismatched blade weights, mixed blade types on the same rotor, or a blade installed in the wrong orientation.
Fix:
- Shut down immediately
- Re-inspect all blade weights and orientations
- Confirm all blades in the set are identical specification
- Re-check that no blades were skipped on any carrier
Hardware Backing Out During First Use
Problem: Blade pins or bolts loosen or eject during initial operation — most often from reused lock hardware that had lost retention, under-torqued fasteners, or an incorrect hardware grade.
Fix:
- Retrieve and inspect failed hardware
- Replace with correct-grade new fasteners
- Re-torque to spec and verify with a post-run check
- Do not operate the machine with any blade hardware loose or missing
Pro Tips for Better Blade Replacement
Replace Blades Before They Fail You
Swap blades before the season's heaviest use — don't wait for total failure. Check blades every 8–10 hours of use in heavy conditions. Light grass may allow several seasons of use; abrasive or woody terrain typically demands replacement every season or after 50–100 operating hours.
Keep a Simple Replacement Log
Good records turn guesswork into a predictable maintenance schedule:
- Photograph or label the blade arrangement before removal on unfamiliar machines
- Log replacement dates, blade type installed, and total hours at each change
- Use the log to spot premature wear patterns tied to specific terrain conditions
Consider an Upgrade for High-Abrasion Work
If you're running in rocky fields, road verges, or dense scrub, standard blades wear out fast. Hard-faced or coated replacements cost more upfront, but the extended service life and fewer mid-season swaps make up the difference. Clean Cutter's Super-Koat blades are built specifically for these high-wear conditions.
Conclusion
Safe, correct blade replacement—from full machine shutdown and PPE through to torque verification and post-run validation—directly determines how long the new blades last and how reliably the mower performs. Skipping steps like torque checks or balanced replacement sets up rotor imbalance and premature hardware failure within a few operating hours.
Treat blade replacement as a scheduled maintenance event rather than a reactive repair, and document each service for accurate wear tracking. Operators who track service intervals consistently get significantly more working life from each blade set—and fewer unplanned stoppages mid-season.
Frequently Asked Questions
How often should flail mower blades be replaced?
Replacement interval depends on terrain and vegetation. Light grass conditions may allow several seasons of use, while abrasive or woody conditions may require replacement every season or after 50–100 operating hours. Inspect every 8–10 hours and replace at any sign of structural damage, deep nicks, or significant thickness loss.
Do I need to replace all flail mower blades at the same time?
Replacing blades in matched sets is strongly recommended to maintain rotor balance. A single blade swap changes weight distribution and causes vibration that stresses bearings and gearbox components — and uneven wear undermines cutting consistency across the full rotor.
Can I sharpen flail mower blades instead of replacing them?
Light dullness can be addressed by grinding back to the original bevel angle, but blades with deep nicks, bends, cracks, or significant thickness loss should be replaced. Sharpening a structurally compromised blade restores edge but not integrity, and a blade failure at operating speed is a serious safety hazard.
What size and grade of hardware do I need when replacing flail mower blades?
Consult the mower's service manual for the specified bolt grade, diameter, and torque value. Generic or lower-grade hardware is not a safe substitute — undersized or soft fasteners can shear under load, turning a blade into a projectile. Use OEM-specified or equivalent-grade hardware and torque to spec every time.