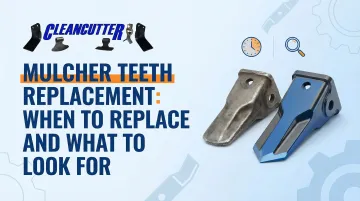
Introduction
Miss the replacement window on mulcher teeth and you're looking at strained machinery, damaged rotor components, and unplanned downtime. Wait too long and the machine suffers. Replace too early and you're throwing away usable parts.
Most operators replace by feel or convenience rather than actual condition. This guide cuts through the guesswork — covering:
- Specific wear signals that indicate it's time to replace
- How operating conditions affect replacement timing
- What to inspect when selecting replacement teeth
- The real cost of getting the timing wrong
Key Takeaways
- Wear rates vary by terrain, tooth material, and operating intensity, so no single replacement schedule fits every situation
- Watch for visible carbide loss or chipping, rounded cutting profiles, excessive vibration, and reduced throughput
- Time replacement carefully — too late risks rotor and holder damage, too early burns budget unnecessarily
- Inspect teeth after every major job or every 50–100 operating hours, whichever comes first
- Choose the right grade of replacement tooth for your specific terrain and use frequency
Why Replacing Mulcher Teeth at the Right Time Matters
Mulcher teeth are the machine's primary cutting interface. When they degrade past a functional threshold, the rotor, tooth holders, and drum begin absorbing impact forces the teeth were designed to handle, accelerating wear on far more expensive components.
What Worn Teeth Do to Performance
Worn teeth create measurable problems:
- Reduced material throughput
- Uneven or incomplete mulching
- Need for multiple passes over the same area
- Increased fuel consumption as the machine works harder for the same result
The Cost of Waiting Too Long
According to Fecon's Teeth and Rotor Guide, when teeth wear down to the point where the tool holder contacts the material, "it can damage the tool holder and other parts of your mulcher, resulting in costly repairs." Rotor and holder repairs cost far more than routine tooth replacement — turning a minor maintenance expense into a major capital repair.
Replacing Too Early Has Its Own Costs
Unnecessarily frequent replacement increases part spend without improving output, and disrupts workflow with avoidable downtime. The goal is condition-based replacement, not calendar-based. If teeth show only minor surface scuffing, no tip deformation, and performance metrics are unchanged, they don't yet need replacement.
When to Replace Mulcher Teeth Based on Different Scenarios
Replacement timing depends on three main factors: operating intensity, terrain conditions, and where your job falls in the seasonal workflow. Each variable shifts the calculus differently.
Operating Intensity and Usage Volume
High-intensity operations accelerate tooth wear:
- Continuous use: Large land-clearing contracts with dense vegetation or heavy timber
- Operating hours: Track hours as a replacement benchmark; research the OEM-recommended inspection interval for your specific mulcher model and tooth type to establish a baseline
- Light-duty vs. heavy-duty: Intermittent use requires less frequent inspection than continuous commercial operations
Virnig Manufacturing notes that excessive vibration, hydraulic temperature increases, or performance drops are potential signs teeth need replacement — and these symptoms surface faster when the machine runs hard.
Terrain and Material Conditions
Rocky or Abrasive Terrain:
Rocky, abrasive, or debris-heavy terrain sharply cuts tooth life compared to soft-soil or light-brush environments. Operators working in rocky substrate should:
- Inspect more frequently
- Consider shifting to more wear-resistant tooth grades (carbide-tipped or hard-faced options)
Unexpected Debris:
Even with a solid inspection schedule, hidden rocks, stumps, or buried debris can cause sudden tooth damage mid-job. That warrants an unscheduled inspection regardless of where you are in the replacement interval.
Maintenance Cycles and Seasonal Workflow
Strategic Timing:
Align tooth inspection and replacement with natural workflow breaks:
- Before a major project begins
- At the end of a season
- During scheduled equipment service windows
Pre-season replacement on heavily worn teeth is often more cost-effective than a mid-job failure — particularly for operators with tight project schedules.
Signs It's Time to Replace Your Mulcher Teeth
Signs It's Time to Replace Your Mulcher Teeth
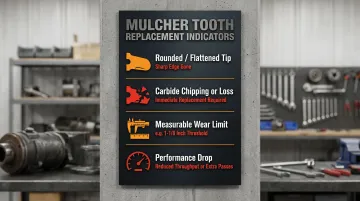
Visible Wear on the Cutting Tip
Start by checking the tip profile. A sharp or angular cutting edge that's become rounded or flattened is a reliable first sign of wear.
For carbide teeth, FAE's inspection guidelines specify that if the tip becomes "smooth and curved," cracked, or shows visible chipping, the tooth needs replacing. Complete carbide loss from the holder means replacement is required immediately.
Some manufacturers publish exact wear limits. Loftness, for example, sets a measurable threshold for its planer teeth: replacement is required when the cutting edge wears down to exactly 1-1/8 inches from the back side of the tooth. If your OEM publishes similar specs, use them — guesswork costs more than a scheduled swap.
Performance-Based Signals
Watch for these operational changes:
- Noticeably reduced cutting speed
- Need to make multiple passes over material the machine previously handled in one
- Engine/hydraulic system working harder than usual under the same load
Fecon advises operators to monitor production levels: "A noticeable decrease in production often indicates that your teeth need replacing."
Uneven Wear Across the Rotor
If some teeth show extreme wear while others are near-new, it indicates a rotor balance issue that will accelerate damage to surrounding components. Partial tooth sets should be replaced together to restore balance.
Physical Damage Indicators
These conditions require immediate replacement:
- Cracks in the tooth body
- Bent or deformed holders
- Loose tooth fit in the holder (caused by impact damage)
The Vibration Signal
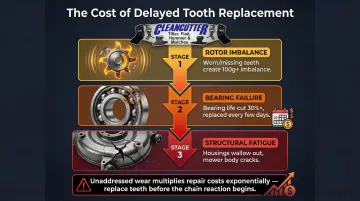
Physical damage isn't always obvious from a visual check alone. Abnormal vibration during operation — particularly vibration that's new or has intensified — often points to tooth imbalance from uneven wear or breakage. According to rotor balancing experts, a single missing carbide tooth at 250mm radius creates 100+ grams of imbalance — enough to feel in the cab. This should trigger an immediate inspection before the next operating session.
When to Avoid Replacing Mulcher Teeth — and What Happens If You Wait Too Long
When Replacement Is Premature
Replacing teeth when they still have functional wear life remaining is unnecessary spending. If teeth show only minor surface scuffing, no tip deformation, and performance metrics are unchanged, they do not yet need replacement. The goal is to read actual condition rather than react to cosmetic wear.
What Happens When Replacement Is Delayed
Cascading Component Damage:
When replacement is delayed past the point of functional wear:
- The degraded tooth profile forces the machine to work inefficiently
- Thermal and impact stress increase on the holder and rotor
- In severe cases, worn or broken teeth expose raw steel holders to direct material contact, requiring welding repairs or a full rotor rebuild
What starts as a $50 tooth replacement can escalate into hundreds of dollars in holder repairs or rotor work.
The Bearing Failure Chain:
Research on dynamic balancing of mulcher rotors shows that an unbalanced rotor cuts bearing life by 30% or more. The damage chain progresses:
- Bearings fail — some operators end up replacing them every few days
- Bearing housings get wallowed out from excessive play
- Prolonged vibration eventually fatigue-cracks the mower body itself
The Safety Dimension
Beyond equipment damage, there's a direct safety risk. Severely worn or fractured teeth can break apart at operating speed, creating projectile hazards for bystanders and nearby equipment. Timely replacement isn't just about performance or cost — it's about keeping people safe.
What to Look For When Choosing Replacement Mulcher Teeth
Reassess Tooth Type and Hardness Grade
Replacement is an opportunity to reassess the tooth type being used. If wear rates have been faster than expected, upgrading from a standard plain-steel tooth to a hard-faced or carbide-tipped option can extend service life considerably in high-impact or abrasive conditions. On the flip side, running heavy-duty teeth in light-duty applications is an unnecessary expense.
Material-Specific End-of-Life:
- Steel teeth: Virnig specifies that steel planer teeth reach end-of-life when they can no longer be sharpened to a sharp tip
- Carbide teeth: Run until they wear down to the steel casing — they cannot be sharpened
Clean Cutter's Hardness Grade Options
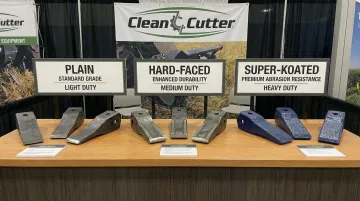
Clean Cutter offers flail and mulcher replacement blades in multiple hardness grades designed to match different operating intensities:
- Plain: Cost-effective for lighter use
- Hard-Faced: Enhanced durability for demanding conditions
- Super-Koated: Extended protection against wear and environmental exposure
Clean Cutter's cross-reference catalog covers compatibility across major mulcher and flail mower brands — including Alamo-Mott, Loftness, Seppi, and Maschio — so you can confirm the right part before you order.
Correct Fitment Is Non-Negotiable
Even the right hardness grade will underperform if the tooth doesn't fit correctly. Always verify that replacement teeth match the holder type, mounting configuration, and rotor design specified by your equipment manufacturer. Using incompatible teeth can cause:
- Accelerated holder wear
- Vibration
- Voided equipment warranties
Best Practices for Timing Mulcher Tooth Replacement
Three habits separate operators who stay ahead of tooth wear from those who lose time to field failures.
Build an Inspection Log
Track operating hours per job, note terrain type, and record tooth condition at each inspection. This creates a pattern over time that reveals the actual wear rate for your specific machine and operating environment, so you can anticipate replacements before a job — not scramble during one.
Replace in Matched Sets
Replace teeth in balanced sets across the rotor, rather than replacing individual teeth reactively. Both Loftness and SEPPI mandate paired replacement: "Always be sure to replace the teeth in pairs (the damaged or worn tooth as well as the tooth on the opposite side of the rotor) to keep the rotor properly balanced."
This approach:
- Maintains rotor balance
- Reduces vibration-induced wear on surrounding hardware
- Ensures consistent cutting performance
Use Replacement Windows Proactively
When a tooth is approaching — but hasn't yet reached — the replacement threshold, schedule the swap during the next planned downtime rather than waiting for failure in the field. Keep a small inventory of the tooth styles your machine uses; most suppliers have lead times of several days, and a mid-job breakdown will cost far more than a spare set on the shelf.
Frequently Asked Questions
How long do mulcher teeth last?
Lifespan varies widely based on tooth material (carbide vs. steel), terrain abrasiveness, and operating intensity. Track hours and inspect condition regularly rather than relying on a fixed time-based estimate.
How often should you sharpen mulcher teeth?
Carbide mulcher teeth generally cannot be sharpened and must be replaced when worn. Steel teeth may be sharpened when wear is minor, but once wear is significant, sharpening is less effective than outright replacement.
Are toothed mulcher blades better than standard blades?
Toothed or carbide-tipped options offer better durability and rock resistance for heavy-duty applications, but standard blades can handle light vegetation at lower cost. Match the blade type to what you're actually cutting.
What are the best teeth for mulchers?
Carbide-tipped teeth hold up best in demanding conditions — rocky terrain, dense brush, high-volume work. Steel teeth are the cost-effective choice for lighter use. Always confirm compatibility with your specific mulcher model before ordering.
Can you replace just a few mulcher teeth, or do you have to replace them all at once?
Individual teeth can be replaced, but matched balanced sets across the rotor are strongly recommended. Replacing just one or two risks vibration imbalance and accelerates wear on the teeth that remain.
What happens if you run mulcher teeth past their wear limit?
Impact forces shift to the holders and rotor drum, increasing the risk of tooth breakage and projectile hazards. What starts as a routine replacement can quickly become a costly structural repair.