Introduction
You fire up your tiller, the engine roars to life, everything sounds normal—but the blades sit motionless. The field isn't getting tilled, and you're stuck diagnosing what went wrong.
Non-rotating blades are one of the most common tiller complaints. The cause can range from a simple debris wrap you can clear in minutes to a failed drive component requiring professional repair.
How you diagnose the problem matters as much as the fix itself. According to OSHA agricultural equipment safety data, improper inspection practices contribute to hundreds of PTO-related injuries annually — knowing the right sequence keeps you safe and gets you back in the field faster.
This guide covers the 6 most common reasons tiller blades stop turning, how to diagnose each one, and what it takes to fix them before the problem gets worse.
Key Takeaways
- Most common causes: broken drive belt, sheared pins, tangled debris, disengaged engagement mechanism, worn/damaged blades, or gearbox failure
- Snapped belts, debris wrap, and disengaged mechanisms are all DIY-diagnosable fixes you can handle without a shop visit
- Always disengage the PTO and disconnect power before inspecting the blade assembly
- Blades that are worn, bent, or cracked should be replaced, not repaired
- If the gearbox is the issue, professional repair or full replacement assessment is needed
How Tiller Blades Are Supposed to Work
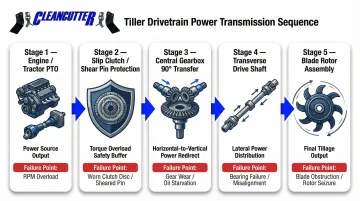
Power flows from the engine or tractor PTO through a driveline protected by a slip clutch or shear pin, into a central gearbox. The gearbox transfers power at a 90-degree angle to a transverse drive shaft, which rotates the main blade rotor shaft. A failure anywhere in this chain stops blade movement completely.
Standard tiller operation:
| Input Source | Input Speed | Output Rotor Speed |
|---|---|---|
| Tractor PTO | 540 RPM | 208–254 RPM |
| Standalone Engine | 3,600 RPM | 180–240 RPM |
Tiller blades are designed to rotate at speed to break, turn, and aerate soil. Any reduction in rotation means incomplete tilling, uneven soil prep, and added equipment stress.
When blades stop entirely, the drivetrain is broken at one specific point. Identifying that point is the fastest path to a fix.
6 Reasons Your Tiller Blades Are Not Turning
Most blade-stoppage issues fall into six predictable categories. Identifying which one applies gets you back to work faster.
Cause 1: Broken or Slipped Drive Belt
The drive belt transfers rotational power from the engine or PTO to the blade shaft. A cracked, worn, or slipped belt breaks this power transfer completely, leaving blades motionless even while the engine runs.
Visual wear indicators:
- Cracking or glazing on the belt surface
- Frayed edges or cuts
- Unusual wear patterns or charring from heat
Inspect the belt for damage or misalignment. A slipped belt may be reseated on its pulleys, but a worn or snapped belt must be replaced with a manufacturer-specified part. For belt-drive tillers, tension must be checked every 4 hours of operation — with re-checks every 10–15 minutes during initial break-in to allow for stretch.
Cause 2: Sheared or Worn Shear Pins
Shear pins connect the PTO shaft to the gearbox input shaft. They're designed to break intentionally when blades strike a hard obstruction — rock, root, frozen ground — protecting the gearbox and drivetrain from more costly damage.
Locate the shear pin housing on the blade shaft or axle hub, remove the broken stub, and install the correct OEM-spec replacement.
Critical warning: Never substitute standard bolts for shear pins. Manufacturers strictly prohibit using Grade 8 or Class 10.9 bolts — they don't shear at the correct load rating. When blades strike an obstruction, that force transfers directly to the gearbox, causing far more costly internal damage than replacing the pin would have.
OEM shear pin specifications:
| Manufacturer | Bolt Specification | Torque Requirement |
|---|---|---|
| King Kutter | Grade 2 | Finger tight / secure |
| Befco | M08-1.25x45 Class 8.8 | N/A |
| Land Pride | M6x40 Class 8.8 | 8 ft-lbs (11 Nm) |
Cause 3: Debris Tangled Around the Blade Shaft
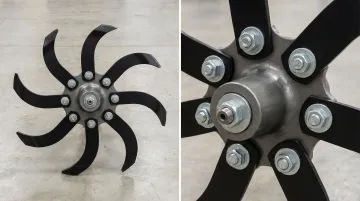
Vines, grass, crop residue, wire, cable, or plastic wrap can accumulate around the blade shaft and create enough resistance to stall or seize rotation — even with the belt and pins intact.
With the engine off and power disconnected, clear all debris from the shaft using a utility knife or pliers. Inspect the shaft seal for damage before restarting.
Post-wrap inspection is critical: Friction from tightly wrapped trash frequently melts or tears the rotor's oil seals, leading to rapid gearbox fluid loss. Check for oil leaking from the gearbox or chaincase — this points to a damaged seal, bent shaft, or unseated seal.
Cause 4: Disengaged or Faulty Blade Engagement Mechanism
Most tillers use a lever, clutch, or PTO switch to engage blade rotation. If this mechanism is stuck, maladjusted, or mechanically failed, the blades won't receive power regardless of engine status.
Start by confirming the engagement lever is fully depressed and in the correct operating position. Then inspect the linkage or cable for fraying, disconnection, or binding — adjust or replace as needed.
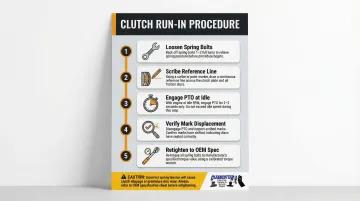
If your tiller uses a slip clutch, occasional slippage when hitting rocks or roots is normal. Continuous slippage with a burning smell, though, indicates worn friction discs or lost spring tension. After extended storage (30+ days), run through this clutch reset before putting the machine to work:
Clutch run-in procedure :
- Loosen spring bolts/nuts progressively (typically 1-2 full turns)
- Scribe a line across the clutch plate and friction discs
- Engage PTO at idle for 2-3 seconds to force slippage
- Verify scribed marks have moved
- Retighten springs to OEM specification
Cause 5: Worn, Bent, or Loose Tiller Blades
Individual blades that are bent, cracked, or loose on the rotor create imbalance and drag that prevents the full assembly from turning freely. Blades worn past their service limit also lose enough mass to fail under load.
With the rotor stationary, inspect each blade for bending, cracking, and fastener tightness. Replace worn or damaged blades with correctly rated parts.
When to replace blades:
- Blades worn down to approximately 1/4" of remaining material
- Blades that have lost 20-30% of original thickness
- Any blade showing metal fatigue cracks
- Bent blades beyond straightening
When installing replacements, follow these practices to avoid creating new problems:
- Replace blades in matched sets to maintain rotor balance
- Torque blade bolts to manufacturer spec (typically 73–265 ft-lbs depending on model)
- Confirm the sharp cutting edge faces the direction of rotation
Clean Cutter's hard-faced and Super-Koat-coated replacement blades are manufactured for extended service in rocky or abrasive soil. The Super-Koat surface treatment resists wear and edge degradation longer than uncoated steel, which reduces rotor imbalance and the drivetrain stress that eventually leads to belt or gearbox failures.
Blade bolt torque specifications:
| Manufacturer | Model Series | Blade Bolt Torque |
|---|---|---|
| Bush Hog | RTN / RTNR / RTH | 118 ft-lbs |
| Bush Hog | RTS | 73 ft-lbs |
| Befco | Series 1 | 265 ft-lbs (M27 bolt) |
| King Kutter | TG Series | 100 ft-lbs |
Cause 6: Gearbox or Transmission Failure
Internal gearbox failure — from oil starvation, contamination, or wear — can seize or skip the gear train internally. The engine and belt function normally, but power never reaches the blade shaft.
Diagnosis steps:
- Check gearbox oil level and condition first
- Listen for grinding or clicking from the gearbox under load
- Note that a seized gearbox typically requires professional inspection
Gearbox maintenance intervals:
- First oil change: After 50 hours (removes break-in debris)
- Routine checks: Every 50 hours
- Oil changes: Every 250 hours
- Lubricant spec: SAE 80W-90 EP (Extreme Pressure) gear oil
Warning: Overfilling the gearbox is a documented failure cause. Expanding hot oil will blow out the breather cap or rupture oil seals.
How to Diagnose and Fix the Problem: A Step-by-Step Approach
Before touching any part of the blade assembly:
- Disengage the PTO
- Shut off the engine (or disconnect tractor power)
- Wait for all rotation to stop
- Remove the spark plug lead on engine-driven models
- Set the parking brake and remove the ignition key
Step 1: Observe and Document the Symptom
Note whether blades are completely still, sluggish, or intermittently stalling. Record whether the issue began suddenly (suggesting a shear pin or belt snap) or developed gradually (suggesting wear-related causes). Check whether the engine bogs under load or maintains normal RPM with no blade movement.
Step 2: Work Through the Drive Chain Systematically
Start with the most accessible and common cause:
- Inspect the belt first for slippage or damage
- Check the shear pins
- Clear any visible debris around the shaft
- Confirm the engagement lever is fully operational
Only move deeper into the drivetrain if these common causes are ruled out.
Step 3: Inspect Blades and Rotor
With the drivetrain checked, manually attempt to rotate the blade rotor by hand. Free rotation confirms the issue is upstream in the drivetrain. Stiffness or seizure points to individual blade damage, bending, or debris lodged between the blades and the hood.
Step 4: Test After Each Fix
After addressing each identified cause, restart the tiller under no-load conditions and observe blade engagement. Then test under normal operating load in soil. Before returning to full operation, confirm:
- Blades are spinning at full speed
- No abnormal vibration or grinding is present
- No belt slippage recurs under load
Fix or Replace? How to Decide
Belts, shear pins, and individual blades are consumable parts — replacing them is routine and inexpensive. Internal gearbox or transmission failure is a different story: repair costs climb quickly and often justify comparing the repair bill against the equipment's remaining value.
When to replace blades outright:
- Blades bent beyond straightening
- Metal fatigue cracks visible
- Worn thinner than manufacturer's minimum specification
- Causing rotor imbalance
When to call a professional:
- Gearbox is grinding, leaking oil, or internally seized
- Engagement mechanism has failed at the transmission level
- You cannot isolate the cause after completing visual inspection steps
Once you've confirmed the blades need replacing, finding the right fit matters. Clean Cutter's parts catalog cross-references over 200 tiller blade types with OEM part numbers from manufacturers including Maschio, Sicma, John Deere, Rhino, and Kuhn — so you can match the correct blade spec to your exact model without guesswork.
How to Keep Your Tiller Blades Spinning Season After Season
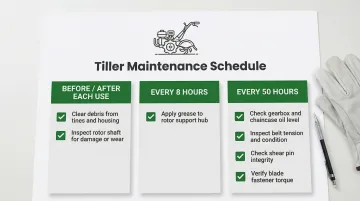
Pre-season and mid-season inspection routine:
- Check belt tension and condition
- Inspect and replace shear pins if showing wear
- Confirm all blade fasteners are torqued to spec
- Clear debris from shaft and blade housing before and after each use
- Grease outboard rotor support hub every 8 hours
- Check gearbox and chaincase oil levels every 50 hours
Harder, better-coated blades resist bending and wear longer, reducing rotor imbalance and drag that can stress the drivetrain and lead to belt or gearbox failure. Look for blades with wear-resistant coatings or hard-faced edges for heavy-use or rocky-soil applications.
Clean Cutter has manufactured tiller blades since 1963 and offers blade treatment options — including hard-faced and Super-Koat variants — that hold up longer in abrasive soil conditions, reducing the chain of blade-related failures that work back into the drivetrain.
Operational habits that reduce wear:
- Avoid forcing the tiller through frozen, extremely dry, or heavily rooted ground at full speed
- Reduce forward speed in difficult soil conditions (less than 1 mph in hard soil)
- Allow the tiller to come to a complete stop before reversing direction
- Never turn the tractor with PTO engaged and tiller in the ground
- Set tiller for shallow penetration (2-3 inches) on first pass when breaking new ground
Frequently Asked Questions
Why is my tiller not tilling?
"Not tilling" typically means blades are not rotating or not cutting effectively. The most common causes are a broken drive belt, sheared pins, or worn/damaged blades. Start with the belt inspection, then check shear pins, then inspect blade condition.
Can a tiller break new ground?
Yes, tillers can break new ground but require more effort. Blades dull and stress components faster in unbroken or compacted soil. Start at a shallower depth (2-3 inches), make multiple passes, and inspect blades and shear pins for wear after each session. Mow tall grass and weeds before tilling to prevent rotor wrapping.
How do I know if my tiller drive belt needs replacing?
Visual signs include cracking, glazing, frayed edges, or visible stretching. A belt that slips under load—engine revs but blades slow or stop—is a functional sign that replacement is needed even if the belt appears intact. Belts should be inspected every 4 hours of operation.
What happens if I replace a shear pin with a regular bolt?
Standard bolts do not shear at the correct load rating. If blades strike a hard obstruction, the force transfers to the gearbox and drivetrain instead of breaking the pin. This can cause significantly more expensive internal damage than a shear pin is designed to prevent—potentially destroying the gearbox entirely.
How often should tiller blades be replaced?
Replacement frequency depends on soil type, hours of use, and blade material. Inspect blades at the start of each season and after any impact with a hard obstruction. Replace when blades show approximately 1/4" of wear or have lost 20-30% of original thickness—hard-faced and coated blades typically extend that interval in abrasive or rocky soils.
Need replacement tiller blades? Clean Cutter has been manufacturing tiller blades since 1963, offering plain, hard-faced, and Super-Koat options compatible with over 200 tiller models. Contact their team at (800) 345-2335 or sales@cleancutter.com to find the right replacement blades for your equipment.